


Luxembourgguidelines.org – How To Prep Nails For Gel Polish. Do you want to look beautiful with nails that look neat and shiny? One method that is popular today is using gel nail polish. Before starting to apply cat nail gel, there are several important steps to take. This is done to prepare the nails for maximum results. Preparing your nails with gel nail polish is not difficult, as long as you know the correct steps. In this article we will provide a complete guide before using gel nail polish. Starting from cleaning nails to removing cuticles.


How To Prep Nails For Gel Polish
The following are steps that can be implemented, including:
- The first step in preparing your nails is to thoroughly clean your hands and nails. Then, wash your hands with soap and warm water. This is done to remove dirt and natural oils. After that, dry your hands with a clean towel. This is important because remaining oil or dirt can reduce the adhesion of gel nail polish. Make sure your nails are clean and free of residue.
- Next, trim your nails by cutting them using nail scissors or nail clippers. This is done to get the desired length. Nail shape according to preference, starting from round, oval, square, and almond. Additionally, you can use a nail file in one direction to smooth the edges and prevent splitting of the nail. A rough nail file can make the tips of your nails brittle and break easily. So, make sure to choose a file that is gentle but effective.
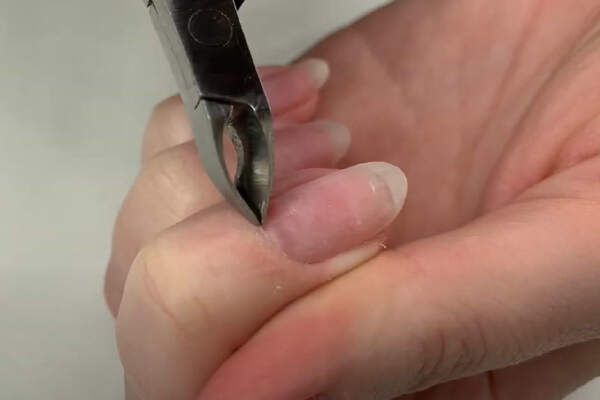
- Once your nails are neatly shaped, focus on the cuticles. Soak your fingers in a bowl of warm water for a few minutes to soften the cuticles. Then, use a gentle cuticle pusher to push the cuticles back. Avoid cutting cuticles as this can cause infection and irritation. Keeping cuticles healthy and neat helps create a good base for applying gel nail polish.
Furthermore
- The next step is to smooth the nail surface. Use a nail buffer to gently smooth the nail surface. This helps remove the natural shine of the nail and creates a better surface for the gel polish to adhere to. Make sure not to rub too hard, as this can damage the top layer of your nails and make them thin to brittle. Nail buffers usually have different sides, ranging from rough to smooth. Then, you can use it gradually to give the best results.
- Once your nails are buffered, you can clean off any residue that may be left behind. Use a cotton swab or tissue dampened with alcohol-free nail cleanser to remove nail dust. This step is important to ensure that no dust or oil remains on the nail surface. Apart from that, it can also interfere with the adhesion of gel nail polish. Make sure the nails are dry before continuing to the next step.
- Applying a base coat is a crucial step in preparing nails for gel nail polish. The base coat acts as a base that protects the natural nail and helps the gel nail polish adhere better. Apply a thin and even base coat to the entire nail surface. Make sure it doesn’t get on the skin or cuticles as this can cause the gel nail polish to peel. The base coat must be cured under a UV or LED lamp according to product instructions. Typically, it takes about 30-60 seconds, depending on the type of lamp used.

Furthermore
- Once the base coat is dry, you can apply gel nail polish. Before that, make sure there is no residue or oil on the nails. Clean, dry nails are the key to a smooth, long-lasting application. Apply thin layers of gel nail polish and cure each layer under a UV or LED lamp. This drying process is known as “curing” and ensures the gel polish hardens and sticks firmly. Repeat application and curing as needed, usually two layers can get the perfect color.
- Finally, once all layers of gel nail polish have been applied and dried, finish with a gel top coat. Top coat provides a protective layer that makes gel nail polish long-lasting and shiny. Just like base coat and gel nail polish, top coat also needs to dry under a UV or LED lamp. After curing, nails will look shiny and perfect. For best results, remove any sticky residue with a cotton swab soaked in alcohol-free nail cleanser.
So, hopefully after reading the discussion in this article you can understand it well, use it as an additional reference, increase your knowledge and insight. Then, and in the future it can be useful and can apply this knowledge in everyday life.