


Play Sound on Raspberry Pi – The Raspberry Pi Zero, unlike earlier Pi variants, does not include an audio port; instead, it uses the microphone and a USB sound card to offer audio capabilities. We are all aware of the Raspberry Pi Zero W’s pin-based PWM setup and lack of audio hardware. To connect the extra hardware to the Raspberry Pi, use a USB sound card or custom analog with an ADC (analog-digital converter). In this article, which is a part of our series on the Raspberry Pi Zero, we’ll install a USB sound card in the Raspberry Pi Zero W and use ALSA tools to test the sound card and other audio equipment.

Also Read : How to Play Cah (Cards Against Humanity) Properly
Component needed to set up and test the Play USB sound card on the Raspberry Pi Zero :
- Raspberry Pi Zero W
- Monitor
- Speaker
- Mic
- OTG Cable
- Micro HDMI
- Micro SD card
- USB sound card
- USB Hub
Pre-requisite
Your Raspberry Pi should already be running an operating system and be able to connect to the internet. If it isn’t, you may still get started with the Raspberry Pi Zero W by using our headless setup without monitor instruction from earlier. Another presumption is that you can access the terminal window on your Raspberry Pi. In this tutorial, we’ll connect the Raspberry Pi Zero W to MobXterm in SSH mode.

Play Sound on Raspberry Pi: USB Sound Card
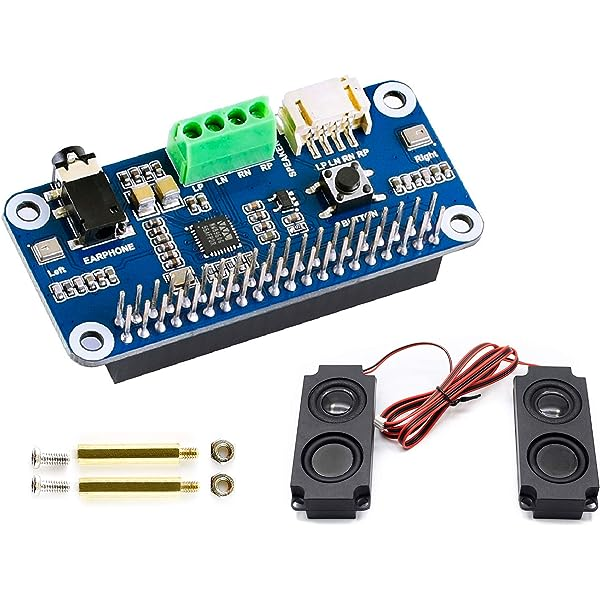
We will connect the Raspberry Pi Zero W’s microphone and speaker using a USB Sound Card, a USB to 3.5mm microphone and headphone jack converter. With the 3.5mm Earphone Splitter Adapter, you can utilize a USB port to add a mono microphone input and a stereo output to your laptop or computer. It transforms one USB connection into two 3.5mm female jacks. You may see a picture of a USB sound card in the image that follows.
Features of USB Sound Card
- USB plug
- One 3.5mm (3-position) Female Jack for the headset, and one for the microphone.
- Particularly for headphones with a microphone
- circumvents the drawback of some portable USB connectors, using two different angles to turn a USB port 3.5mm audio ports that let you attach an external speaker and a microphone.
- Tangle-free flat cable design for convenience
- enables the usage of outdated audio equipment with modern computers
- utilizes USB portable devices and is compatible with all such devices.

1. Installing USB Sound Card in Raspberry Pi Zero W
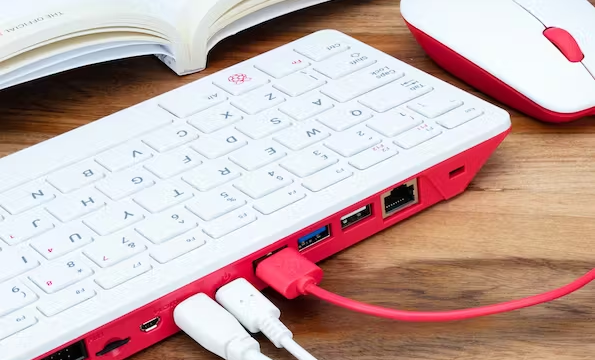
Now, attach an OTG cable to the Raspberry Pi zero W and link it to your monitor using a micro-HDMI connection. After that, use a USB hub to link the Raspberry Pi zero W and USB sound card, and a 3.5 mm audio connector to attach the speaker and microphone. You can see all of the connectors on the Raspberry Pi zero W in the image below. After finishing all connections, turn on the Raspberry Pi zero W via a micro-USB cable.
You must first determine the chipset for your device. Chipsets come in four main varieties. One of the four chipsets from the following list should be compatible with your device.
- CM108 Type
- CM-Headphone
- Type CM109
- GeneralPlus
With the help of a USB hub and an OTG cable, connect your USB audio card to the Raspberry Pi Zero W. Launch Raspberry Pi Zero W normally after that. Now, under the setup settings, switch your audio from a 3.5 mm jack to a USB port.
You may view some lines concerning the CM109 chipset by typing command dmesg | grep cm109 in the terminal window at this point. Try dmesg | grep if it doesn’t work. Headphone The driver for the C-Media USB Headphone Set will show up. It is obvious that it is a CM-headphone from here. If nothing shows up, type dmesg | grep C-Media in the terminal window. Despite the fact that the cm109 driver is absent, there are some C-Media remarks. This suggests that the device is a CM108. If nothing happens once more, enter the command dmesg | grep General in the terminal window to find the phrase “GeneralPlus.” It is a GeneralPlus, as this suggests.
- In the terminal window, type the lsusb command. An output similar to the image below should be shown.
- Enter the aplay -l command right away in the terminal window. A list of playback hardware devices will appear.
2. Raspberry Pi Zero W Configuration Installation
Advanced Linux Sound Architecture is known as ALSA. For our Raspberry Pi Zero W, we’ll install the ALSA driver. You may make the USB sound device the default audio device by altering the “alsa.conf” system file. Enter the command sudo nano /usr/share/alsa/alsa.conf and the following two lines will appear in the terminal window.
- Default audio is played on audio card 0, while built-in audio is played on audio card 1, thus switch the two.
- Now, type sudo nano /etc/asound.conf in the terminal window, copy the following content there, and then save the file. It will set control card 1 and PCM (audio) as the defaults.
- For your OS, we’ve set up ALSA. We have now restarted using sudo reboot and logged in once again. Enter the command line below in the terminal window in order to test audio ().
- The audio card’s left and right speakers will play white noise as a result. Once everything is working, try playing an audio file using speaker-test (for WAV files, not MP3).
- To check front and center audio, use the following command.
- For the Raspberry Pi zero W, we have now tested the speaker audio (output audio). We will now use a CM-headphone style adaptor to record audio. Utilizing the command below, we may record audio.
- It will record mono (-c1) signed 16-bit (S16_LE) audio at 44100 Hz (–rate 44100). The speaker will play back echoes of recorded sound. The-V mono’s command line will display a tiny VU meter if you include it.