


How to Fix Bubbles in Drywall Tape – To fix a drywall tape bubble, chip off any hardened joint compound that is on top of the bubble before proceeding with the repair. Next, cut away and remove the tape segment that has bubbles. After applying joint compound to the drywall seam with a putty knife, cover the bubble removal area with a fresh piece of tape. Making ensuring the new tape overlaps the old tape at both ends is crucial. Using a putty knife, smooth a layer of joint compound over the tape. To proceed with sanding and applying more layers of compound, just let the joint compound dry completely.

Also Read : How to Fix White Spot on Phone Screen
Is Bubbles in Drywall Tape Normal?
There are occasions when even experienced drywall installers run across bubbles in their drywall tape. Therefore, it’s not unusual for you to see bubbles in your drywall tape when doing a house repair. But if you don’t fix bubbling drywall tape, it will make your walls appear terrible. That’s why it’s critical to address tape bubbles as soon as you notice them.
How to Fix Bubbles in Drywall Tape
It just takes a few minutes to fix an air bubble with drywall tape. When you apply the last coat of paint, the space will look nicely refurbished since you followed these procedures to create a flawless finish. Better yet, all you need are a few basic tools to do the task. This is how you do it:
1. Hardened Drywall Compound that Chips Away
You can skip this step if, while the joint compound is still wet, you have seen a drywall bubble. However, until the first layer of joint compound has cured or even before you start painting, you might not see bubbles in your paper tape. In the event that this occurs:
- To remove the solidified drywall mud, use one of the smaller scrapers included in this set of joint compound putty knives.
- Till the bubbling part of the tape is visible, remove the solidified joint compound.
- Once the bubbled section of tape and the 1 inch (2.5 cm) of tape on either side of the bubble are visible, keep removing joint compound.
If you make any inroads into the bubbled tape area in this phase, that’s acceptable. Later on, we’ll be changing and deleting this section. Just be careful not to harm the wall’s surrounding regions since this will require more substantial mending work down the road.

2. Cut Out the Section of Bubbled Tape
Once you’ve located a portion of bubbled tape, cut a straight line through the tape on both sides of the bubble using a utility knife. After that, take out the tape piece you cut out. This piece of tape is unnecessary, therefore dispose of it.
- Make a vertical cut through the paper tape on both sides of the air bubble with this utility knife.
- Cut a ½-inch (1 cm) distance from the bubble. Never slice through the bubble.
- Take out and dispose of the cut-out portion of tape.
- It is preferable to remove the entire stretch of tape rather than cutting off individual bubbles if there are many bubbles in one piece.
It’s better to replace the entire area and remove many feet of tape at once if you have a single length of paper tape with several bubbles. Cutting off four or five smaller sections with bubbles takes longer than replacing the entire area after removing the six feet (2 meters) of tape.
3. Apply the New Joint Compound to the Region
After removing the paper tape, apply a thin coating of joint compound using a putty knife to the affected region. The seam between the drywall pieces should be filled with this layer of joint compound. Additionally, it creates the ideal substrate for the new tape to stick to.
- After removing the old tape, apply a fresh coat of joint compound using a putty knife.
- The joint compound layer need to be ⅛ of an inch (3 mm) thick.
- You can apply more joint compound in subsequent applications if the thickness of the joint compound is not the same as the surrounding region.
It is not necessary to coat the seam with a heavy coating of joint compound. Even if the joint compound isn’t as thick as it is elsewhere, that’s acceptable. You will need to apply many layers of drywall mud in order to paint over drywall seams. It’s not necessary for it to seem flawless after the first layer.


4. Cut a Fresh Drywall Tape Piece to Length
After applying a fresh coat of joint compound, trim a fresh piece of tape to conceal the seam. The length of the new tape should be such that it overlaps the old tape by ½ inch (1 cm) on both ends. This guarantees that there aren’t any spaces between the tape pieces, which might result in an uneven finish.
- After cutting out the bubbled part, cut a fresh piece of paper tape to cover the opening.
- Ensure that the length of the new tape is sufficient to overlap the old tape at both ends by at least ½ inch (1 cm).
Although you have the option to measure and cut your tape to length, it’s usually simple enough to estimate the necessary length without a measuring tape. It should be able to close the gap as long as the new tape overlaps the old tape on both ends.
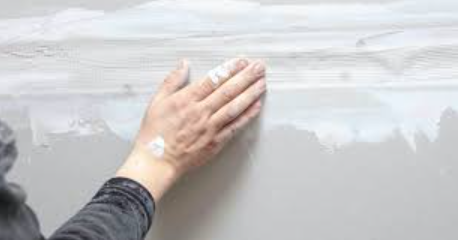
5. How to Fix Bubbles in Drywall Tape: Put the Drywall Tape in Place
Press the fresh piece of tape over the cutout part with one hand. Make sure the new tape overlaps the old tape with extra caution. Next, thoroughly smooth the tape over the joint compound bed using your putty knife.
- Make sure the new tape overlaps the old tape by pressing one end of it against the opening.
- To get the tape to lay flat over the drywall seam, use a putty knife to smooth it out.
Verify that the fresh tape is free of bubbles. It ought to rest on the joint compound, smooth and level. Don’t worry if there are a few minor wrinkles. The following action will be beneficial.
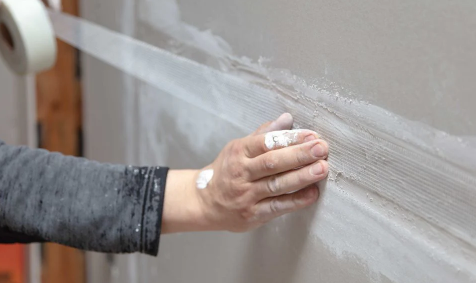
6. Distribute Joint Compound throughout the Fresh Tape.
Using your putty knife, lightly scoop some joint compound onto the edge. Next, coat the freshly cut paper tape with joint compound. Consider dragging the joint compound in a left-to-right direction from one end of the new tape to the other. The idea is to cover the new tape piece with a thin, smooth coating of joint compound.
- Scoop up a little amount of joint compound with your putty knife.
- To cover the fresh piece of tape and create a smooth finish, spread joint compound over it.
- Verify that the tape is free of bubbles.
- It’s okay if there are tape edges visible through this initial paper tape layer; additional mud applications applied to the drywall junction will hide them.
Verify that the tape is bubble-free and flat by looking at it. It doesn’t matter if the tape has little creases or if you can see the borders of it. Afterwards, joint compound coatings will cover them.
7. How to Fix Bubbles in Drywall Tape: Permit Drying of the Joint Compound
After fixing, give the joint compound a full day to set up. After that, you may apply more layers of drywall mud and finish the drywall using the appropriate sandpaper. The region where you removed the air bubble will be absolutely unnoticeable after applying two to three applications of joint compound.
- Give your first application of drywall compound a full day to cure.
- After sanding all of your drywall joints, add more joint compound layers.
- To get a smooth, professional finish, use two to three applications of joint compound and sand in between.
It just takes a few minutes to complete this operation, which may turn uneven drywall finish into smooth, polished walls. Removing air gaps from drywall tape is always time and effort well spent.