


How to Set Work Hours in Outlook – We’ll get deep into the procedure and learn how to establish working hours in Outlook in this tutorial, which is replete with helpful hints drawn from some of the most dependable websites online. By the time it’s all over, you’ll know exactly how to adjust Outlook to fit your schedule.
An essential component of the Microsoft Office suite, Outlook has developed steadily over time to accommodate the shifting demands of its user base. Helping people organize their schedules more efficiently is one area where Outlook has really shined. If you are someone who has to manage a team with different schedules or manages a range of appointments, you understand how important it is to precisely plan your working hours. By doing this, you can make sure that your schedule is only filled when you’re free and steer clear of confusion or conflicting appointments.

Also Read : How To Upgrade Shields On Monopoly Go
Why It’s Important Than Ever to Establish Precise Working Hours
1. Work from Home & International Cooperation
Working with coworkers in various time zones has become commonplace due to the rise in remote work. Precise working hours avoid calls for late meetings from global colleagues.
2. Tools for Automated Scheduling
AI-powered scheduling aids frequently use Outlook to gather data. Reliable operation hours guarantee the efficacy of these instruments.
3. Digital Welfare
Setting limits promotes mental health and a digital detox, particularly in this day and age when it’s difficult to distinguish between work and home. According to a research, having clear work-time boundaries might help people feel less stressed.

How to Set Work Hours in Outlook
Step 1, Getting to the Advanced Calendar Preferences
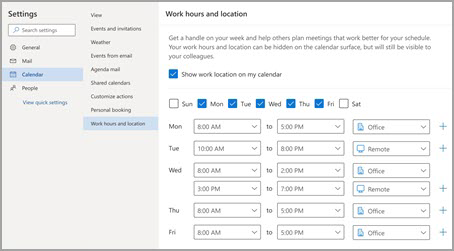
Locate the “Work time” area after navigating to the “Calendar” under “Outlook Options.” This is the area of magic that occurs.
Step 2, Making Changes for Half-Days or Different Hours
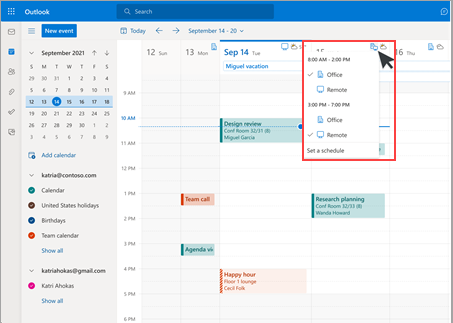
What happens if you work half days on Fridays but start early on Mondays? Make use of recurrent appointments: If your work schedule is flexible, use them to reserve time for non-working hours. This clearly indicates to others that you are available visually.
Step 3, Managing Time Zones
For those balancing many time zones:
- The feature “time zones”
Outlook lets you see numerous time zones at once. This is useful if you often work with a team that is located on the other side of the globe.
Step 4, Outlining the Workweek
A “Work week” option is located directly beneath the working hours. It gives you the option to choose which days make up your workweek. Make sure that just the days that you work, such Monday through Friday, are checked.
Step 5, Conserving Modifications
Click “OK” to make the changes effective when you’re happy with them.