


How to Set Up Starlink – In areas that have historically been without high-speed internet, Starlink has already brought millions of people online. The simplicity of use of Starlink is one of its main benefits, in addition to offering customers fast download speeds and accommodating cancellation rules. I’ll take you step-by-step through the Starlink installation procedure in the upcoming post so you can start using it right away.
Also Read : How To Make Rosemary Oil For Hair
1. It’s Time To Open
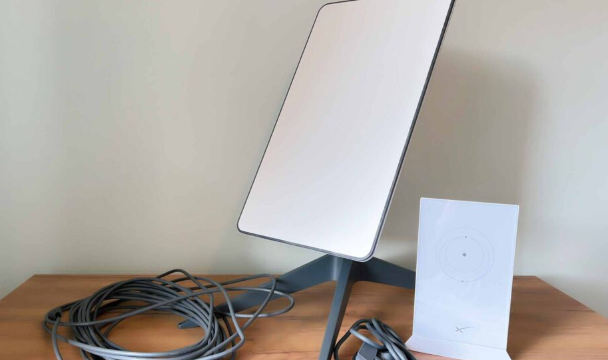
Unpacking your Starlink package, which you should have gotten by the time you’re reading this article, is the first step. You can read the whole post I wrote on the contents of the Standard kit (which costs $599) here. In summary, you get:
- An antenna, sometimes called a dishy
- Antenna mounting base for Wi-Fi routers that provide internet connectivity
- An energy-related AC power cord
- A 50-foot wire to link the dishy to the router
If the hardware appears to have been utilized, don’t be alarmed. For financial reasons, Starlink doesn’t always send out brand-new kits.


2. How to Set Up Starlink: Install the app
You may already download Starlink’s mobile app while you wait anxiously for your kit to arrive. Starlink updates its iOS and Android app stores. As an alternative, you may control your Starlink preferences directly from a web browser. Just go to the following URL, which replicates a lot of the app’s functionality.
However, bear in mind that in order to access settings from a browser, you must first be connected to Starlink’s Wi-Fi network.
3. How to Set Up Starlink: Look for a Clear Space
You must locate a space free of obstructions, such as trees or buildings, before you can begin assembling your kit.
When a request (uplink) for a webpage or other online material is sent, Starlink establishes a connection with the hundreds of satellites that are dispersed across low-Earth orbit (LEO) at a distance of around 550 km (~ 341 miles).
Upon receiving the data, those satellites may forward it to another satellite through intersatellite connections or transmit it directly to a ground station via a downlink, which connects to the internet backbone and delivers it to the server you are attempting to visit. It then travels back up to the satellite before reaching your dish.


All parties (dishy, satellites, ground stations) communicate with each other using microwave radio frequencies, which are unable to pass through solid things since they travel in straight lines. Therefore, the secret to reducing downtime is to identify an open space.
The Starlink smartphone app will help you determine the ideal location to reduce obstacles, whether you choose to place your antenna on top of a roof or leave it on the ground.
To begin, launch the Starlink app and select START SETUP. Choose the ordered antenna from there. You’ve probably selected the Standard antenna (upper-left corner) if you’re a Residential plan subscriber.
After that, the Starlink app will urge you to connect in your power cables—a topic I’ll go into in the next section. Therefore, after you’ve located a suitable location, click on FIND AN INSTALL LOCATION and choose I’M READY!.
Next, you will need to gather the green dots within the darkish boundaries that indicate your dishy’s theoretical field of view. You may use the Starlink app to find out how many theoretical obstacles your antenna will encounter when the scan is complete.
Remember that this is only an estimate. Once fully charged, your system will begin gathering data to ascertain the true extent of obstacles throughout the course of the following 24 hours.


4. How to Set Up Starlink: In-Plug Cables
Now that you’ve located a good location, turn on your Starlink router and antenna. You hook your 50-foot wire into the antenna loosely by default. Gently pull the cord to remove it. Avoid using excessive force. In the past, a few customers have claimed that doing so destroyed the cable.
After removing the cable, put it through your base’s bottom end. As an alternative, you may alternatively connect the cable to the base and then to your antenna; either way, it works just fine. Reinstall the cable in the mast now. Make sure the plug is all the way in. Power outages can occur because the antenna cable has a tendency to not always plug in all the way.
A clever method to guarantee correct cable insertion is to cut a piece of paper and place it beneath the cable. Just take the piece of paper out after plugging in the cable. It’s time to attach the antenna to the mast now. When it’s correctly inserted, a clicking sound ought to be heard.
Next, put the other end of the 50-foot wire into your Wi-Fi router’s left side. Apply the same principle to the power cord that you insert into the router’s right side.
When everything is connected correctly, there should be a white light between the two cable ports in the center of the bottom of your router. Moreover, dishy will detect this booting up by aligning itself in a horizontal posture.
A drawback of Starlink may be the necessity to make a hole in a wall since the antenna has to be in constant contact with the router. Furthermore, the router cannot be placed outside as it is designed for indoor use only. I would advise against starting any major house modifications until you have given Starlink a thorough test.


5. Link Up With The Internet
You should now be able to connect to the internet after fully charging your dishy. By selecting OPEN SETTINGS, the Starlink app will ask you to access your phone’s Wi-Fi settings. Either STARLINK or STINKY are the two possibilities that Starlink by default shows (in my instance it was STARLINK). Just give the network a click. In the “WiFi Network Name” area, you may modify Starlink’s default name. In the “provide WiFi Password” field, you can provide a password. Lastly, choose CREATE to complete the procedure.
Once there, click on CONTINUE to access Starlink’s mobile app. After a nearly flawless installation, the Starlink app’s homepage will appear. As stated and shown above, Starlink will require around a full day to gather information regarding obstructions. Because the system takes time to calibrate, performance should also settle after around fifteen minutes.
To make sure that all of the hardware components are operating correctly, you need also download the most recent software update, which is shown on the webpage.