


How to Screenshot on Gateway Laptop – There are several ways to snap screenshots with Gateway computers. Taking a screenshot with the keyboard and utilizing the built-in tools are the two most popular methods for capturing screenshots on Gateway laptops. Which approach therefore ought should you take? What you should know is as follows!
Here is where to go if you’re having trouble taking screenshots on a Gateway laptop. This article provides some simple screen capture applications that you may use to quickly take screenshots of Gateway computers. You may always find a viable solution here, regardless of what operating system your Gateway computer is running—Windows 11, 10, 7, or even previous versions. Let’s get going now!


To take high-quality screenshots on your Gateway PC, you will need to find professional screen capture software. We tested a ton of well-known products before deciding to share EaseUS RecExperts with you.
With this program, you may take complete or partial laptop screenshots and export them as PNG files. Additionally, it enables one-click snapshots on one or two monitors, depending on the situation. Aside from that, it’s a great screen recorder that lets you take pictures of anything on your screen, even private films. In conclusion, the Gateway laptop is a dependable instrument for screen recording as well as screenshots.

Also Read : How To Get Gold Cards In Monopoly Go
Take Free, Excellent Screenshots with Your Gateway Laptop
Step 1
To take a screenshot of your screen, use this program and select the area you want to capture. Click “Full Screen” and choose Display (if there are several monitors) to take a full-screen picture. Then, to begin your assignment, click the camera icon in the upper right corner.
Step 2
(Optional) Select the Region option if you plan to take a partial screen. Next, choose the target location by left-clicking and holding the mouse down. Select the camera icon to take a screen grab of your screen. Finally, to locate and examine your screenshots, select Recordings >Pictures.


Screenshot of a Gateway Computer with a Direct Print Screen Key
You may utilize the screenshot shortcut to quickly finish the operation if you wish to capture a comprehensive screenshot of your Gateway laptop. You can always count on this approach to swiftly and efficiently take a photo of your Gateway laptop, regardless of whether it is running Windows 11, 10, 8, 7, or even XP. On your device, you are unable to utilize it to take a screenshot of a particular window or region.
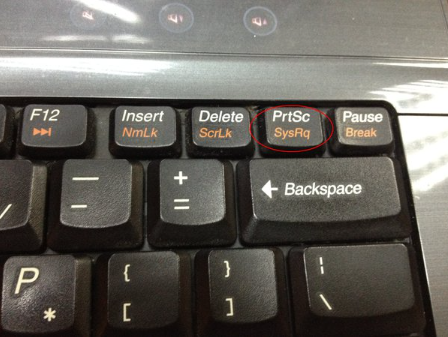
- Locate and hit the keyboard’s Print Screen key. The keyboard shortcut PrtScn may appear on various keyboards.
- Your snapshot will then instantly be saved to your clipboard. There won’t be any obvious signs that you’ve already captured screenshots.
- After that, you may copy and paste the screenshot for additional editing or sharing by pressing Ctrl + V.