


How to Grow Magic Mushroom – You are undoubtedly aware that psilocybin mushrooms are the same as magic mushrooms. What does that actually mean, though? The Psilocybes family, which all evolved to produce the psilocybin chemical as an insect deterrent, is referred to as “psilocybin mushrooms.” It’s challenging to concentrate on your meager meal when rainbows are all around you!
As a psychedelic molecule, did you realize that psilocybin is fully passive on its own? While all members of the psilocybe family include psilocybin, the effects of each member differ greatly, and the psychedelic effects begin when psilocybin breaks down into psilocin in the stomach of the user. Not all of them have the ability to create extremely vivid hallucinations.
Prior to Beginning Your Own Home Grow of Magic Mushrooms
It is insufficient to only desire to have fun while considering psilocybin cultivation. Initially, ascertain whether cultivating these mushrooms is lawful in your nation or specific state! We also can’t emphasize enough how crucial it is to produce magic mushrooms safely, even if you discover that everything is well. No, really. It is best to read more. Don’t wait till your apartment is equipped with a functioning greenhouse! Keep in mind that fairy rings of mushrooms might be hazardous locations for unsuspecting tourists.

Also Read : How Easly to Catch a Cheater on iPhone
Growing mushrooms requires patience and care
Second, remember that growing mushrooms requires patience and care. While certain species are simple to grow, others are only accessible to specialists! Knowing what kind of psychedelic you want is also crucial, as you will be investing time and energy into growing your own psychedelic mushrooms. Sort research species based on growing ease and psychological impacts before buying.
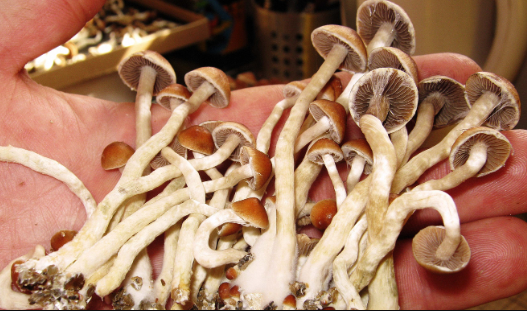
Many choose to begin cultivating psilocybin mushrooms with Golden Teachers. Their smooth experience that seldom disturbs customers is well matched with their ease of growth. Growers who are more self-assured may choose to consider the cheekily titled Penis Envy mushroom, which is highly sought after due to its potency. The common consensus is that they are well worth the bother, despite being a shy species that needs a lot of attention to grow to their full height.

How to Grow Magic Mushroom
1. Preparation
Get the jars or boxes ready for the hallucinogenic mushroom cultivation. After sanitizing them with alcohol, pierce each lid four times, at the same exact location. The 2-2-5 ratio of water, rice flour, and vermiculite will make up your substrate. To start, combine two parts water and five parts vermiculite. After removing extra water from the sieve, add two parts rice flour. Put this substrate into your growing containers.
Take cautious not to pack your containers too tightly as you fill them. Fill them to a half-inch below the top. To insulate the substrate, top over the containers with a dry layer of vermiculite after sterilizing the tops.
The substrate needs to be steam sterilized at this point. To guarantee that the containers don’t come into contact with the base, place your towel or paper towels inside the huge cooking pot. Tightly cover their lids with aluminum foil. Fill the saucepan with tap water to about halfway the height of your containers, then slowly boil it. Give the jars a 1:15–1:30 hour to steam in this low-temperature boil. Your foil-covered jars should stay in the pot for a few hours after steaming. Maybe, just to be sure, overnight!

2. How to Grow Magic Mushroom: Vaccination
Sanitation, sanitation, sanitation! The needle of your syringe can be heated with a lighter until it glows red hot. After letting it cool, give it a gentle alcohol wipedown. To equally disperse the psilocybe spores, pull back the syringe’s plunger and shake the device.
After taking the foil off of the first jar and pushing the syringe through one of the holes, inject the spores to inoculate your substrate. Once the needle touches the glass, inject ¼ of the spore solution into the container’s side. After doing this for the last three holes, use micropore tape to close them. Proceed with the inoculation process for every remaining container, ensuring that your needle is sterilized in between each administration.
3. The act of colonization
Patience is the key to this process. Your inoculation jars should be placed in a spotless, accessible area. Look for somewhere in the 70–80°F (21-27°C) temperature range that is not in direct sunshine. In a week or two, white, fluffy mycelium will start to emerge from your inoculations.
Look out for signs of contamination! Despite your best efforts to maintain hygiene, mold and bacteria can persist. It’s better safe than sorry to report any weird colors or scents you see! Get rid of the damaged containers right away. You will have entirely colonized containers in three to five weeks.
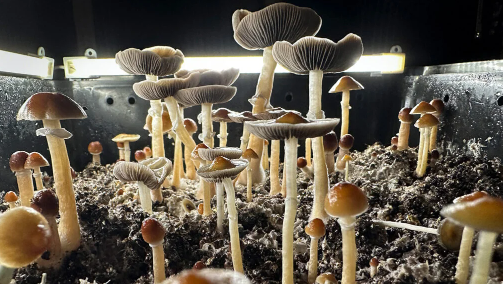
4. Setting Up the Grow Chamber
Grab your plastic storage container and start drilling holes all over it. Really? Make holes in the sides, base, and lid every two inches with a quarter-inch bit. To allow air to circulate beneath this container, place it on four stable items after laying down a towel. Bring your perlite into the frame. To soak it, put it in a strainer and run a cold tap over it. After letting it drain until it stops dripping, place it over the grow chamber’s base. Continue until you get four to five inches of perlite.
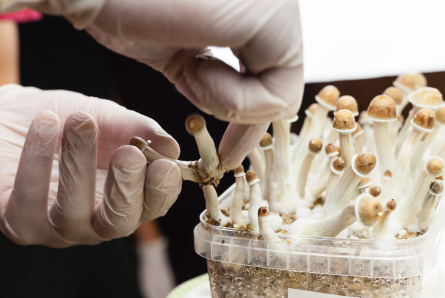
5. How to Grow Magic Mushroom: Bearing fruit
It’s time for your magic mushroom offspring to hatch from your containers! Crack open each of your jars and take off the layer of dry, insulating vermiculite. Treat your substrate cakes with care. Place all of the containers upside down on a clean surface, then tap until the cake comes loose. Give your cakes a final sip of water after they have been let free. Wash each cake individually under cold running water to get rid of any loose vermiculite. Pour room temperature water into a big container, then submerge your cakes in the water. Give them a full day to rehydrate.
Take the cakes out of the water. To completely coat each cake, roll them in the dry vermiculite that has been added to your mixing bowl one at a time. This will keep the moisture in the cakes.
The next thing you need to do is move your mushroom cakes inside the grow chamber. For every cake, cut a square of tin foil that is big enough to keep the cakes from touching the perlite. Before sealing them in, evenly distribute these cakes throughout the grow chamber, lightly moisten it, and give it a quick fan. Four times a day, lightly mist the chamber, being careful not to sop your cakes. When you see mushrooms developing, fan the area after each spraying.